I went to our local Crate and Barrel for a Marimekko event (which really ended up being a Marimekko fabric remnants giveaway) and thought it’d be fitting to wear my Marimekko shift. (And it was: The girls at the store raved about my dress!) My boyfriend took this photo while we were walking through the Boston Public Garden…
Author Archives: milenasews
Outfit Inspiration
I have loads of free time now and, in addition to sewing again, I’ve taken up learning how to use Photoshop. What better way of practicing than by scanning a sketch and trying to do something with it? (Also, first time I sketch in literally over 7 years…)
Here’s an idea for an outfit I dreamt up:
If you can’t tell from the drawing, it’s a short-sleeved shirt with a Peter Pan collar made in contrasting fabric, and a full gathered skirt. The fabric is this Liberty of London super soft cotton I got for $3.95/yd during a fabric.com sale…

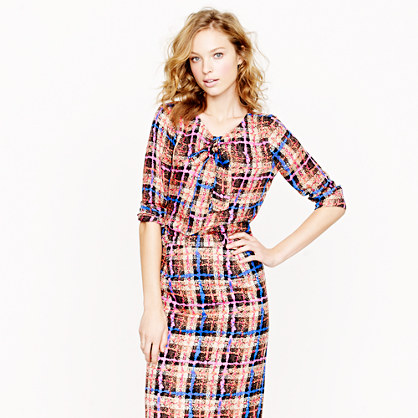
My inspiration was this outfit by J. Crew with a shirt and skirt made from the same fabric. Looks amazing together, sort of monochrome-but-not, and I do get separates out of it that I can mix and match with other things…
What do you guys think? I’m open to suggestions!
Gray Georgette Blouse
I’d like to preface this post by saying that I intended for this blouse to be more of a “wearable muslin” than an actual garment to be super proud of…
In my quest to make more tops that I can wear to work to distract people from the fact that I have maaaaybe 6 different skirts/pants, I made this blouse.
Colette Sorbetto (with spaghetti straps)
There’s only so many times you can see cute Colette garments all over the Internet before you cave and make your own. I have a few patterns I haven’t used so I can’t quite justify buying a Colette pattern right now, but a free download I can print at work? Sold!
This was the first PDF pattern I have ever used, and I have mixed feelings about it. On one hand, I can have it immediately, there’s plenty of them online for free, and it’s not flimsy tissue paper. On the other… Putting it together is tedious as hell. In the end, this one was a good place to start and I think I’ll use them again. Maybe I’ll try Burda’s?
I ordered some Liberty of London fabrics online during a sale Fabric.com held, so the lawns were $23.95/yd instead of $36/yd and they had plenty of cotton prints for $3.95/yd. I bought a huge loot and they fudged my order and sent me the wrong lawn. A quick call rectified that (the right one is in the mail) and they let me keep the one they had already sent, so I got lucky!
The one issue was that the Sorbetto pattern would not fit in 1/2 yd of fabric. (On that note: Colette recommends 1 1/2 yds. for this pattern, even with 60″ fabric… I think you can squeeze it out of 3/4 yds just fine.) To resolve that, I turned the Sorbetto into a spaghetti strap tank top.
My new baby!
I took a break from this disaster to set up my new (to me) serger!
I spotted this number on Craigslist down in NYC and asked my boyfriend to make the journey out to Bushwick to pick it up. It’s not in mint condition but it works very, very smoothly and it was a steal– only $50! The thread tree is broken but I taped it and it works fine; I think I’ll want to buy a standalone thread tree. The lightbulb is out, so I’ll have to replace it as well. But $50 is not a lot of money to experiment with a serger (which I had never done) and this one will last me a while, or at least until I get sick of sewing!
If you hadn’t figured it out yet, it’s a Brother 1034D, which Amazon sells for close to $200. It took forever to figure out how to thread the bastard but I got it up and running and tried it on a new top, which I will post about soon. Figuring out what the right tension was took a few attempts, but I got it right. It makes finishing garments sooo much easier and faster and I am super happy about that. Finishing is my least favorite part of sewing.
I rearranged the furniture in my room this week as well, because my sewing really needs to be better contained. Check out my serger in my new sewing nook, right in my bedroom. (Sewing machine not pictured; it’s on the other side of the room.)
Ugh, this dress…
I started out with the intention of turning this pattern (sans sleeves) into this J. Crew dress:
And all was going well with the bodice, even after altering the pattern to include a waistband, making a muslin and fitting the pattern, and cutting and starting to put it together… Until I realized the skirt I was planning on using for it had darts that did not align with the bodice’s, and I didn’t have more fabric to cut a new skirt.
Oh well.
But I wouldn’t give up. I experimented with adding a pleated peplum (made out of the old skirt) to the bodice and turning it into a top:
… Which was looking good, even with my made-up (but successful) way of sewing pleats. Maybe this wouldn’t be a failure after all!
Looks all good from the front… Until I spot that bit of pulling on the left side. Upon closer examination, the back’s pleats needed to be a bit deeper to account for my back curves:
That just looks terrible! Maybe I was too ambitious by trying to make such a tailored top with finicky stretch fabric and pleats! Grrr… Luckily, I ran out of thread, so that gives me time to contemplate my next steps. I don’t want to give up on it because the fit is otherwise very good and I spent a lot of time on it.
I think I’ll finish it and see what it looks like. At worst, it’ll be a learning experience (I made pleats!) but hopefully it’ll be just like ready-to-wear: not perfect, but good enough.
A peek at what I’m doing next
I’ve sewn a cute little top for work, which I’ve yet to wear so I haven’t posted photos here. In the mean time, check out what I’m working on…
It’s a muslin for a pattern I am altering to look like a dress I saw at J. Crew. I’m going to sew this out of a wadder I made a long time ago with a gorgeous wool crepe that I just can’t throw out. Look at all of those alterations I am having to do to fit my bust properly– this is why I can’t just cut and sew, because there’s always somewhere to take in!
Now with my pattern alterations done, I am off to cut and sew the bodice!
Marimekko shift: Done!
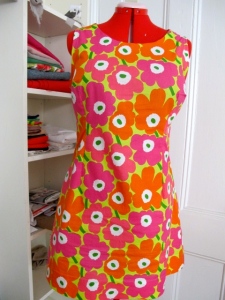
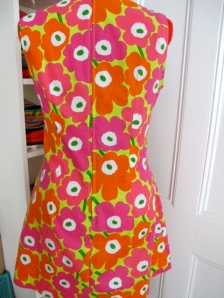
Without much prelude, here’s the finished dress!
It was really easy to sew and allowed me to practice a few techniques like inserting a centered zipper, facing necklines, and finishing seams with bias tape.
I don’t see a point to mastering centered zippers (as opposed to doing invisible zippers) aside from the fact that they make for more authentic-looking vintage inspired garments– can someone enlighten me? Anyway, I saw it as a challenge and this being my second centered zipper, it didn’t turn out too bad! I finished the center back seams with green bias tape that I made at home from the same fabric I used for the neckline facing. (I am very impressed with my neckline facing; it was a lot of work, but my Reader’s Digest Complete Guide to Sewing was insanely useful!)
I am really happy with the fit on this dress– it’s not fitted at all and it wasn’t meant to be. It is super comfortable, looks cute, and I get tons of compliments on it. People think it’s vintage! (I guess the handmade touch makes it look more like it.)
Very successful first dress! I’m already looking forward to starting a new project.
Marimekko shift: Pickin’ Patterns
The goal for my Marimekko dress was simple: I wanted to make a dress with Marimekko fabric that adhered to Marimekko’s aesthetic, so picking the right pattern was important. I needed something with simple, clean lines that showcased the print of the fabric and didn’t interrupt it too much. Enter Simplicity 1776!
There are things that I liked and things I didn’t like about this pattern, some of which I could pick up from just looking at the design and most of which I only figured once the first muslin was on me.
Pros:
- The simple shift looks like a more wearable riff on the inspiration for this dress.
- Came with sleeve options that were not really my style but I could alter to make a cute little cap sleeve if I wanted.
- It looks easy as cake to put together and would allow me to practice my zipper insertion and seam finishing.
Cons:
- This pattern carries a whole lotta ease! So much so that I wondered if I cut my muslin two sizes up.
- No contour darts in the front; only bust darts. So that whole circus tent effect that I was trying to avoid? Marginally diminished in this design.
- Not enough room to fit my hips/butt, so my first muslin pulled a lot and was generally unflattering south of my waist.
- Weird gaping at the armscye because my bust is large and just pulls everything in weird directions.
- Gaping neckline; see above for cause.
Lucky for me, 2 courses in pattern drafting over 6 years ago armed me with a lot of confidence/chutzpah to alter my pattern to fix all of the fit issues.
Fit issues, tackled one at a time:
- Inserted contour darts: I just traced the darts from the back piece to the front piece, so both had identical darts about 1/2″ deep at the waist. Once the muslin was on the dress form, I turned those 1/2″ darts into 1″ darts because it was still too baggy for my taste.
- Too-tight hips: Since I didn’t need an extraordinary amount of extra ease at the hips, I added 1″ at the side front hemline and graded it to the waistline. This fixed the too-tight hips AND changed the skirt’s shape from square and boring to a bit more flared and cartoony (in a good way).
- Weird gaping at armscye and neckline: I’ve altered enough patterns to know my large bust was the cause of this problem. I just drew a 1/4″ deep dart from apex to armcsye and another 1/4″ deep dart from apex to neckline. While I was at it, I also took in another 1/2″ from apex to center bust to give myself a shapelier bust and avoid a weird uniboob effect. I transferred all of these darts to my preexisting bust dart to keep things neat.
After trying on my pattern adjustments with a second muslin, I was all ready to cut into my fabric and start sewing. I’ll share my progress on the next post…
Marimekko shift: The dress that started it all…
I’ve been a huge fan of Marimekko designs for a very long time now. Their loud colors and signature bold patterns are just so fun! Although I have plenty of (deeply discounted) Marimekko goods in my apartment, I never bought any of their clothes for two reasons:
1) Their clothes are not cut for bodies like mine. I have a very hourglass shape and their designs are on the boxier side, which just makes me look like I’m wearing a circus tent. See below:

Amazing, but not flattering on me
2) Frankly, I can’t afford their clothes. Their dresses start in the $250-300 range. Now, I’ve spent that sort of money on clothes before, but I only do so on things with complex construction details, not simple shifts made out of pretty fabric.
On a recent weekend in New York, I walked past the Crate and Barrel on Broadway and Houston and fell in love with a lime green, pink and orange Unikko printed cotton. (Unikko is the signature Marimekko poppy print, which gets re-imagined every season in different colors.)
Imagine my surprise when I spotted the same fabric at the Marimekko flagship on Madison Square, bolts of it resting on a table with a 50% off sign. Yes! I ran to the cutting table with a bolt in hand and requested 1.5 yards. My wallet cried a bit when I paid $36 for a cut of cotton… But when the alternative is a $250+ dress that doesn’t fit well, $36 sounds like a bargain.
And so armed with this fabric, notions and a pattern replicating the cut of Marimekko dresses, I began my journey back into sewing…


